

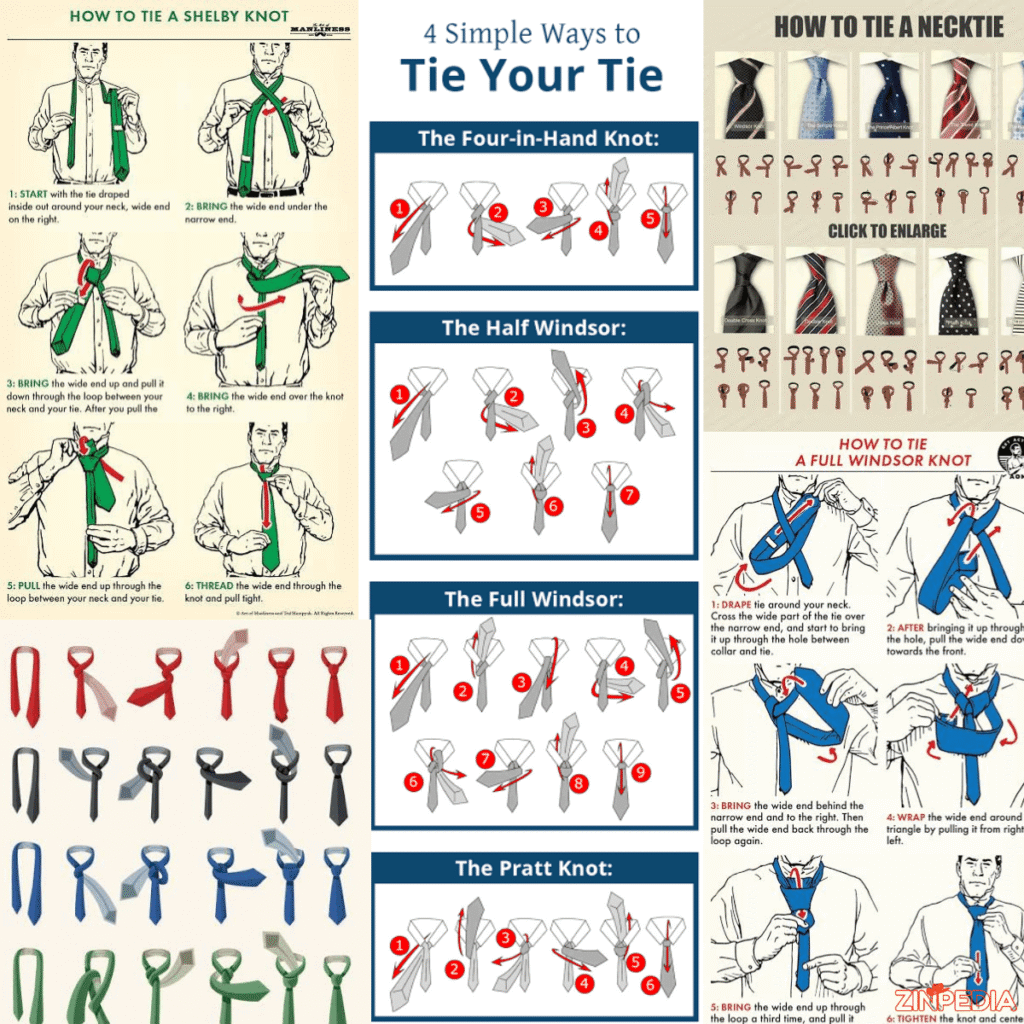
Tying a tie often looks more difficult than it really is.
You may start with both ends around your neck, make a few turns, and then end up with a loose knot, an uneven shape, or a tie that hangs too high or too low. This is completely normal when you are learning.
The easiest way to master a tie is to practice one knot at a time.
You do not need to learn ten different styles. For most situations, three classic knots are more than enough:
- Four-in-Hand
- Half Windsor
- Full Windsor
Each knot creates a different shape and works better with certain collars, tie materials, and occasions.
This guide explains how to tie each knot in simple steps. You will also learn how long a tie should be, how to create a neat dimple, which knot to choose, and how to fix common mistakes.
Understand Your Tie Before Making the Knot
Before you begin, it helps to understand the basic parts of a necktie.
A tie has two ends:
The wide end
This is the larger part of the tie. It forms the visible knot and hangs at the front after you finish.
The narrow end
This is the smaller section. It normally stays behind the wide end and is held in place by the fabric loop on the back of the tie.
Start by buttoning your shirt all the way to the top. Lift the collar and place the tie around your neck with the front side facing outward.
In most tie knots:
- The wide end begins on your right
- The narrow end begins on your left
- The wide end hangs lower than the narrow end
The exact starting length depends on your height, the length of the tie, and the knot you plan to make.
A large knot, such as the Full Windsor, uses more fabric. Therefore, you need to begin with the wide end hanging lower.
Where Should a Finished Tie End?
The tip of the wide end should ideally touch the top or middle of your belt buckle.
If the tie ends above your belt, it is too short.
If it hangs well below the buckle, it is too long.
There is no special trick for correcting the length after the knot is finished. You usually need to untie it and change the starting position.
- Start with the wide end lower if the tie finishes too short
- Start with the wide end higher if the tie finishes too long
After a few attempts, you will remember the best starting position for your height and preferred knot.
How to Tie a Four-in-Hand Knot
The Four-in-Hand is one of the simplest and most popular tie knots.
It creates a narrow knot with a slightly uneven shape. That small amount of asymmetry is part of its style and does not mean you tied it incorrectly.
This knot is an excellent choice for beginners because it requires fewer movements than most other knots.
It is suitable for:
- Everyday office wear
- School uniforms
- Job interviews
- Business-casual outfits
- Narrow shirt collars
- Thick or heavy ties
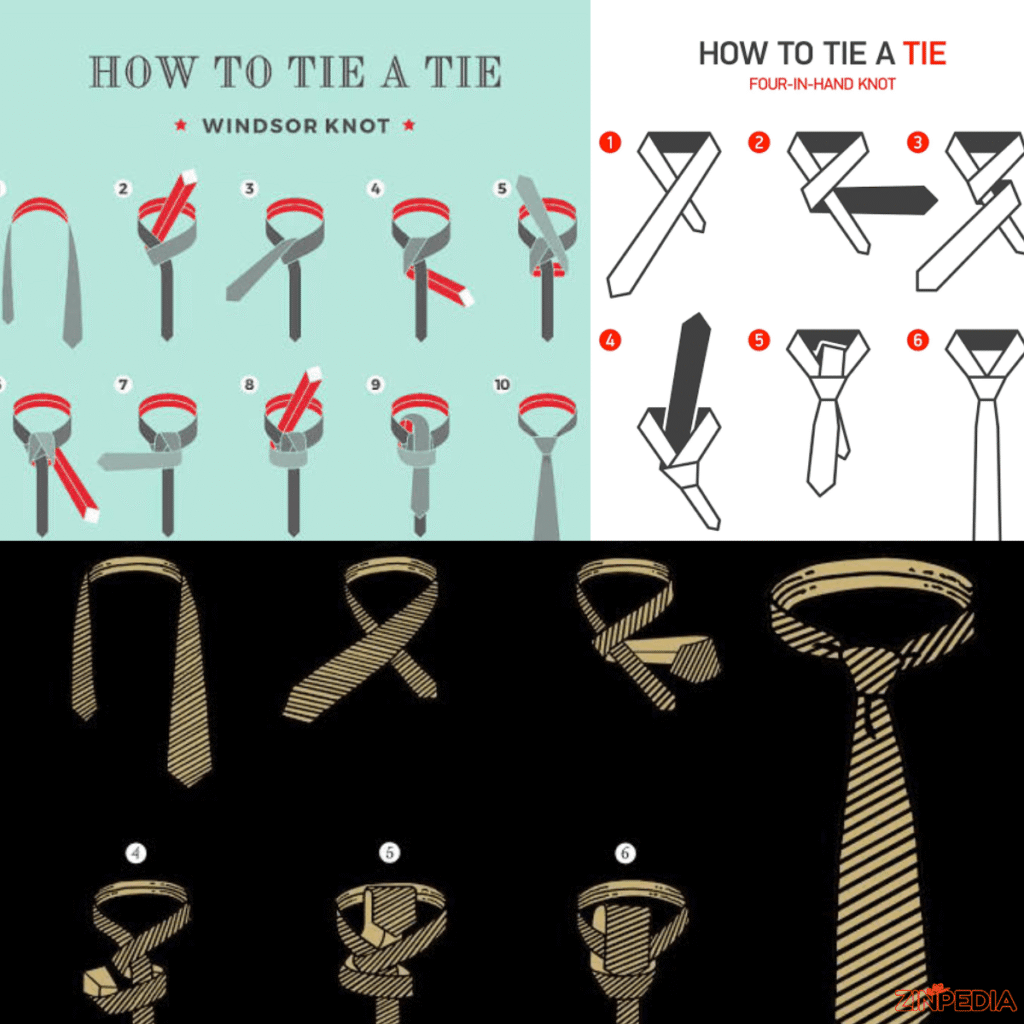
Four-in-Hand Instructions
Step 1: Position the tie
Place the wide end on your right and the narrow end on your left. Allow the wide end to hang much lower.
Step 2: Cross the wide end over
Move the wide end across the front of the narrow end from right to left.
Hold the crossing point near your collar.
Step 3: Take it behind
Move the wide end behind the narrow end and bring it back toward your right side.
Step 4: Wrap it across the front
Bring the wide end from right to left across the front again.
This movement creates a horizontal band around the developing knot.
Step 5: Lift the wide end
Guide the wide end upward through the opening between the tie and your neck.
Bring it through from underneath.
Step 6: Pass it through the front loop
Use your fingers to keep the horizontal band open. Slide the wide end down through this front loop.
Step 7: Tighten the knot
Hold the narrow end with one hand. With the other hand, gently slide the knot upward toward your collar.
Step 8: Make final adjustments
Center the knot, smooth the tie, and fold your shirt collar down.
The result should be a slim knot that looks slightly angled rather than perfectly triangular.
When Is the Four-in-Hand the Best Choice?
The Four-in-Hand is especially useful when your tie is made from thick fabric. A larger knot can become bulky, but the Four-in-Hand remains compact.
It is also a good option for people with shorter necks or smaller frames.
However, the knot may look too small inside a very wide-spread collar. In that case, a Half Windsor may provide better balance.
How to Tie a Half Windsor Knot
The Half Windsor is slightly more formal than the Four-in-Hand.
It creates a medium-sized knot with a cleaner and more balanced shape. It is not as large as the Full Windsor, which makes it practical for regular business and formal clothing.
Many people consider it the most versatile tie knot because it works with a wide range of shirts and ties.
It is suitable for:
- Business meetings
- Professional presentations
- Weddings
- Interviews
- Standard collars
- Medium-spread collars
- Medium-weight ties
Half Windsor Instructions
Step 1: Place the tie around your neck
Keep the wide end on the right and the narrow end on the left. The wide end should hang lower.
Step 2: Cross the wide end over the narrow end
Bring it from right to left across the front.
Step 3: Move it behind
Take the wide end behind the narrow section and bring it toward your right side.
Step 4: Lift it toward the neck opening
Bring the wide end upward toward the loop around your neck.
Step 5: Pass it through the loop
Guide the wide end down through the neck loop so that it falls toward your left side.
This begins to create one side of the triangular knot.
Step 6: Wrap it across the front
Move the wide end from left to right across the front of the knot.
You will now have a horizontal band.
Step 7: Bring it upward again.
Guide the wide end from underneath and push it upward through the neck loop.
Step 8: Slide it through the front band
Pass the wide end down through the horizontal loop you created in the previous step.
Step 9: Tighten it slowly
Hold the narrow end and pull the wide end gently. Slide the knot upward until it sits close to the collar.
Step 10: Shape the knot
Center it and adjust both sides until the knot looks neat and almost symmetrical.
Why Learn the Half Windsor?
The Half Windsor is formal enough for important occasions but not so large that it becomes uncomfortable.
It works well with most face shapes, suit styles, and business shirts.
Once you have learned the Four-in-Hand, the Half Windsor is usually the best knot to practice next.
How to Tie a Full Windsor Knot
The Full Windsor is a large, formal, and symmetrical knot.
It creates a wide triangular shape and fills the space inside a spread collar. It is often chosen for important events where a strong and polished appearance is preferred.
This knot uses more tie fabric than the Four-in-Hand or Half Windsor. For that reason, you should begin with the wide end hanging considerably lower.
It is best suited for:
- Formal weddings
- Important ceremonies
- Executive meetings
- Public speaking
- Wide-spread collars
- Thin or medium-weight ties
- Taller people or those with longer necks
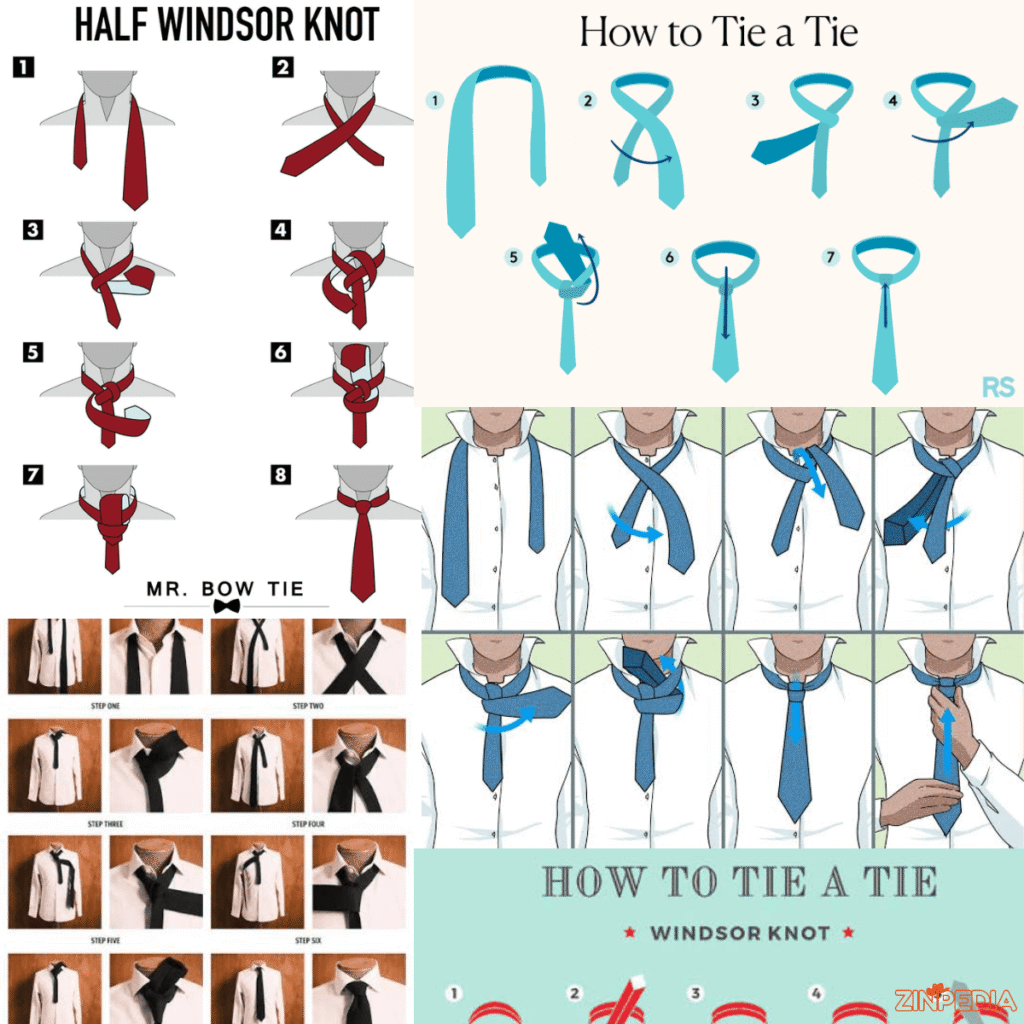
Full Windsor Instructions
Step 1: Set the starting position
The wide end goes right, and the thin end goes left. Allow the wide end to hang down far more.
Step 2: Cross the wide end over
Move the wide end across the front of the narrow end from right to left.
Step 3: Bring it up through the neck loop
Lift the wide end upward from underneath the loop around your neck.
Step 4: Lower it on the left
Pull the wide end down so that it falls on your left side.
Step 5: Move it behind the narrow end
Take the wide end behind the knot and bring it from left to right.
Step 6: Lift it toward the neck loop again
Bring the wide end upward on the right side.
Step 7: Pass it down through the loop
Guide the wide end through the neck opening and let it fall on your right.
At this point, both sides of the knot should begin forming a triangle.
Step 8: Bring it across the front
Move the wide end from right to left across the front of the knot.
This creates the visible front band.
Step 9: Lift it through the neck loop
Guide the wide end upward from underneath once again.
Step 10: Pass it through the front band
Slide the wide end downward through the horizontal loop at the front.
Step 11: Tighten the knot
Pull the wide end carefully while holding the knot. Then slide the knot upward toward the collar.
Step 12: Adjust the final shape
Use both hands to make the knot even. The Full Windsor should look broad, centered, and triangular.
When Should You Avoid a Full Windsor?
A Full Windsor may be too bulky when:
- The tie fabric is very thick
- The shirt collar is narrow
- The wearer has a small frame
- The tie is shorter than standard length
In these situations, a Half Windsor can provide a cleaner result.
Four-in-Hand vs Half Windsor vs Full Windsor
Choosing the correct knot can improve the entire appearance of your outfit.
The knot should match the width of the collar, the thickness of the tie, and the formality of the event.
KnotSkill LevelFinal SizeShapeBest Use
Four-in-Hand Beginner Small Slightly asymmetrical Daily wear and simple outfits
Half Windsor Beginner to intermediate Medium Balanced Business and semi-formal events
Full Windsor Intermediate Large Symmetrical triangle Formal and important occasions
Choose the Four-in-Hand When:
- You want the easiest knot
- You are wearing a thick tie
- Your shirt has a narrow collar
- You prefer a less formal appearance
- You need to get ready quickly
Choose the Half Windsor When:
- You want one knot for many situations
- Your collar has a normal or medium spread
- You need a professional appearance
- Your tie has a standard thickness
- You are attending a meeting, interview, or wedding
Choose the Full Windsor When:
- Your event is highly formal
- Your shirt has a wide-spread collar
- Your tie is not too thick
- You want a strong triangular knot
- You need a bold and traditional style
For most people, the Half Windsor offers the best balance between ease, size, and formality.
How to Make a Tie Look More Professional
A correctly tied knot can still look untidy if the finishing details are ignored.
The following small adjustments can make your tie look sharper.
Add a Dimple Below the Knot
A dimple is the small fold that appears directly under the knot.
It gives the tie depth and helps the fabric fall naturally.
To create it:
- Leave the knot slightly loose
- Place one finger in the center beneath the knot
- Pinch the fabric on both sides
- Tighten the knot while holding the center fold
A dimple is easiest to create with silk or medium-weight fabric.
Keep the Knot in the Center
The knot should cover the top shirt button and sit directly between both sides of the collar.
If it leans to one side, loosen it slightly and move it into position.
Keep the Narrow End Hidden
The narrow end should remain behind the wide end.
Use the small loop on the back of the tie to hold it in place.
When the narrow end does not reach the loop, you may use a tie bar or restart with a different length.
Use a Tie Bar Properly
A tie bar should hold both parts of the tie against the shirt.
Place it around the space between the third and fourth shirt buttons.
The bar should not extend beyond the width of the tie.
Match the Knot With the Collar
A knot looks best when it fills the collar space without crowding it.
A simple guide is:
- Narrow collar: Four-in-Hand
- Regular collar: Four-in-Hand or Half Windsor
- Medium-spread collar: Half Windsor
- Wide-spread collar: Half Windsor or Full Windsor
Match the Tie With the Occasion
For formal business events, choose a clean knot and a simple tie pattern.
For weddings and celebrations, you may wear richer colors or more noticeable patterns.
For interviews, navy, dark red, charcoal, or simple striped ties are usually safe choices.
Common Tie Problems and Easy Solutions
Most beginners face the same problems. Fortunately, they are easy to fix.
The Tie Is Too Short
The front tip ends well above the belt.
Solution: Untie it and start with the wide end hanging lower.
The Tie Is Too Long
The wide end falls below the belt buckle.
Solution: Begin again with the wide end positioned higher.
The Narrow End Is Hanging Below the Wide End
This usually means too much fabric was left on the narrow side.
Solution: Start with the wide end lower and the narrow end higher.
The Knot Is Loose
A loose knot may show the shirt button or look untidy.
Solution: Hold the narrow end and slide the knot upward carefully.
The knot should feel secure without making the collar uncomfortable.
The Tie Is Twisted
The back of the fabric may become visible at the front.
Solution: Keep checking that the front surface of the wide end faces outward during each wrap.
The Knot Looks Too Small
A small knot may disappear inside a wide collar.
Solution: Replace the Four-in-Hand with a Half Windsor or Full Windsor.
The Knot Looks Too Large
A Full Windsor may look oversized when combined with a thick tie.
Solution: Use a smaller knot, such as the Half Windsor or Four-in-Hand.
The Tie Has Wrinkles
Leaving a tie knotted for long periods can damage its shape.
Solution: Untie it after use. Hang it properly or roll it loosely before storage.
Never pull the narrow end forcefully through a tight knot because this can stretch or damage the fabric.
Frequently Asked Questions
What is the simplest way to tie a tie?
The Four-in-Hand is the easiest method for most beginners. It has fewer steps and produces a small, practical knot.
Which knot is best for a job interview?
The Half Windsor is an excellent interview knot because it looks balanced and professional. A carefully tied Four-in-Hand can also work well with a narrow collar.
How far down should a tie hang?
The front tip should finish around the top or middle of the belt buckle.
Should the narrow end be visible?
It should stay behind the wide end. Use the keeper loop on the back to prevent it from moving.
Which tie knot is best for a wedding?
The Half Windsor suits most weddings. A Full Windsor is suitable for more formal ceremonies or shirts with wide collars.
What knot should I use with a thick tie?
Use a Four-in-Hand knot. Its smaller shape prevents thick material from becoming too bulky.
Why does my tie look crooked?
The knot may not be centered, or the tie may have twisted while you were wrapping it. Loosen the knot, straighten the fabric, and adjust its position.
Is the Four-in-Hand supposed to be uneven?
Yes. It normally has a slightly asymmetrical appearance. Choose a Half Windsor or Full Windsor if you want a more even shape.
How tight should the knot feel?
The tie should sit close to the collar but should not feel painful or restrict breathing.
Can a tie be tied without a mirror?
Yes. Once the movements become familiar, you can tie it without looking. However, beginners usually find a mirror helpful.
How many tie knots should a person know?
Two knots are enough for most people. The Four-in-Hand is useful for everyday wear, while the Half Windsor covers most professional and formal situations.
How long does it take to learn?
Many people can learn the Four-in-Hand after several practice attempts. Speed develops naturally once the hand movements become familiar.
Final Thoughts
Learning how to tie a tie is much easier when you begin with a simple knot and practice it repeatedly.
The Four-in-Hand is the best starting point for beginners. It is fast, practical, and suitable for everyday use.
The Half Windsor is ideal when you want a more balanced and professional appearance.
The Full Windsor is a good choice for formal occasions, wide collars, and outfits that require a larger knot.
Whichever style you choose, remember the three most important rules:
- Keep the knot centered
- Match the knot size with the collar
- Make sure the tie reaches the belt buckle
Do not worry when the first attempt is not perfect. Adjust the starting length, untie the knot carefully, and try again.
After a little practice, you will be able to tie a neat, comfortable, and professional-looking tie within a few minutes.
Explore More Helpful Articles– Visit Now